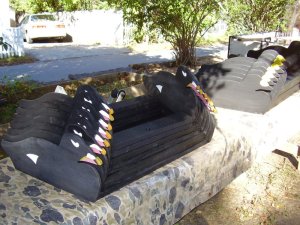
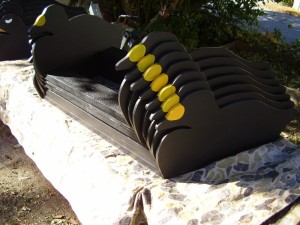
Sleds or shadows have been used for the better part of the last century by duck hunters to attract all types of waterfowl. They are especially good at decoying sea ducks – eider and each of the three types of scoter, also known as “coots.” Hunting sea ducks or “coot shooting” has been popular on both coasts, but was made famous along the outer beaches of Cape Cod and the south shore of Massachusetts. Sleds are effective because they can be easily made to larger dimensions than standard full-bodied decoys, and they are highly visible from long distances.
In his classic novel, A Book on Duck Shooting, Van Campen Heilner writes about the tradition of coot shooting on the hunting grounds outside of Barnstable Harbor. On the first morning of the hunt he remarked, “As it grew light we could see the long lines of coot streaming down the shore and heading into the cove to feed on the mussel beds.” A few lines later, he describes setting out the decoys (sleds) that would be used to pull the birds within gun range, “I threw out my decoys, which strange as it seems, were all in one piece. That is, although there were a dozen decoys, all profiles, they folded up and nested together in one piece to float apart slowly when thrown overboard.”
I’ve made a few sets of sleds for myself and friends over the last 10 years, and have received a lot of questions about how they are put together. A couple of years ago, I posted a rough tutorial on Duckboats.net on the process of making sleds. A slightly revised and improved version of those instructions is provided below.
MATERIALS:
- 1 or 2 sheets of fir plywood (higher grade is better)
- 2 or 3 rough pine boards – 1″ thick and 8′ to 10′ feet long, in whatever width you can find
- 1 box of 2″ stainless steel or Primeguard screws
- 1 tube of exterior construction-grade adhesive
- 1 gallon of oil-based exterior primer – Benjamin Moore Fresh Start is great
- 1 gallon of flat black paint – in oil or acrylic
- Assorted brushes, small cigar roller and frame, roller pan
- A scoter pattern of your choice
The first step in the process is to rip a 4’x8′ sheet of fir plywood in half lengthwise. I recommend using a higher grade plywood that is smooth on one side and has football-shaped fillers on the other. It will cost between $25 and $30 per sheet, but is well worth the extra money as you won’t need to deal with filling voids and holes. I’ll then lay out the pattern I want to use on the 2’x8′ sheet, doing my best to maximize the number of silhouettes that can fit.
Once I determine how many birds I can fit on the half sheet of plywood, I will use a tape measure and straight edge to measure equal sections – in this case, 2’x2′ squares with two birds per square. You should be able to get 16 silhouettes from one sheet of 4’x8′ plywood.
The 2’x8′ sheet of plywood is ripped into more manageable squares to make bandsawing of the patterns easier. This is key.
Cutting the birds out on the bandsaw should be done VERY CAREFULLY. You will want to take your time and slowly follow the pattern. I will take three to four squares and sandwich them together using two screws or finish nails. This enables me to cut four to six birds out at a time, which is a definite labor and time saver. Once you are done, you should have 16 or 32 silhouettes (32 from two sheets of plywood). At this stage, I’ll take a palm sander and round over any rough or sharp edges. This will make the sleds easier to handle with either gloved or bare hands.
The next step in the process is to rip 1″ pine boards into 4″ wide strips. Once this is done, I’ll lay the strips on a pair of saw horses and paint them with oil primer. Once dry, they will be ready for the final coat of flat black paint. This may be a good time to also prime the silhouettes that have been cut out. No sense breaking out the paint twice. To dry the silos, I constructed a drying rack from a 10′ two by four and hammered heavy spikes about every 2″ to 3″. This enables me to dry 20 or more silos at a time.
Since each of my sleds are angled for better visibility on the ocean, it is important to determine what angle the crossboards will be cut. The set in this demonstration was made to fit in the front of my dory, so I took the angle with a bevel gauge and transferred that to the crossboards. In this case it was 15 degrees, so I set my chop saw to 15 degrees.
Once I got the correct angle for my crossboards, I went ahead and cut each one out so that I could assemble the entire rig at once. For this rig, I wanted seven sleds per string. You can do more or less, but keep in mind that more sleds will create more weight in the boat and a very large set of sleds can be quite heavy. Below are the dimensions for each sled. Note that the first measurement is the longest and rear-facing edge of each crossboard.
- Sled 1: rear – 36″ front – 29″
- Sled 2: rear – 34.5″ front – 27.5″
- Sled 3: rear – 33″ front – 26″
- Sled 4: rear – 31.5″ front – 24.5″
- Sled 5: rear 30″ front – 23″
- Sled 6: rear – 28.5″ front – 21.5″
- Sled 7: rear – 27″ front – 20″
I always glue and screw my sled silhouettes to the crossboards. This adds extra strength and durability, as well as some waterproofing to the ends of the boards. I will apply a medium bead of glue to the center of the board to ensure that squeeze-out happens when I finally do sink the screws. This is important as it means that enough glue has been applied to form a good seal.

A medium-size bead of glue is applied to the end of the board. Once screwed, a sufficient amount of glue should squeeze out.
Once assembly is complete, you should end up with a stack of sleds like the one pictured below. If you followed the measurements and plan from above, Sled 1 (the widest) will be on the bottom, Sled 2 will be nested on top of Sled 1, Sled 3 on top of Sled 2, and so on. Angling of the sleds is important as it provides a better profile on the water and they can be seen from a distance. A set of sleds when deployed can be seen from a half mile away or more, and they look very realistic – like a raft of birds.
I hope that you found this tutorial helpful, and perhaps you now have some inspiration to make a set of sleds for your own use. It is a lot of fun, and especially rewarding when you are able to take some eider or scoter over decoys that you made with your own hands. We’ll get into rigging and using long lines in a later thread.


Nice Job Nathan!! The sleds look GREAT!!
Thanks, Carl. Ovah!
First thank you for taking the time to post this. It is very helpful. I took on the task of building these sleds however there is a small problem with it that I found. Your measurements are either paired incorrectly or what I believe to be the case only work with the exact pattern you used. I’m hoping you can help me or maybe post the pattern you used so others won’t make the same mistake by cutting all the wood and it not matching. Thank you again I know that with out this I would have screwed a whole lot more up before getting it right.
Hi there,
So sorry for my late response. This site has been at the bottom of my list of priorities of late. I would be happy to post the pattern that I used. Stay tuned!